-1.png?height=120&name=Confido%20-%20Trademark%20-%20Dark%20(2)-1.png)
This article outlines how to use Confido Legal with the Xero invoicing system.
Prerequisites
- Create a Confido Legal account and a Xero account.
- Create a Standing Link.
Tip: If you are accepting payments for both trust requests and invoices, we recommend creating two separate standing links - one for trust deposits and one for invoices.
Connect Confido Legal and Xero
- Log in to Xero.
- Click the name of the firm in the upper left corner of the home screen.
- Click Settings and then select Payment services.
- In the Other Available Payment Services section, click Add Other.
- Click Custom Payment URL.

- Complete the Add Custom URL form.
- Name: Confido Legal or (Confido Legal Trust)
- Your custom URL: paste the URL from the Standing Link you created earlier.
- Pay now text: Pay Online
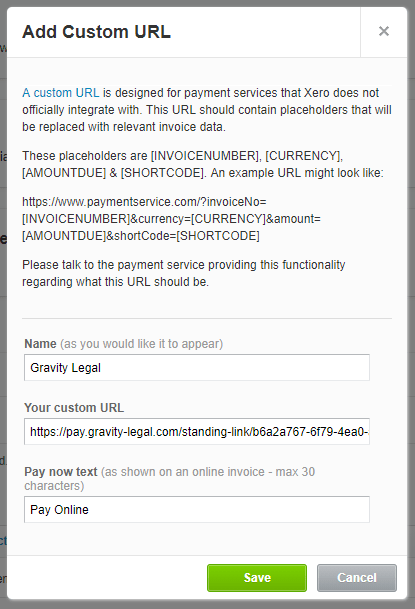
- Click Save.
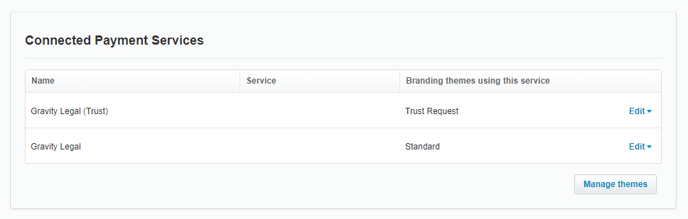
- Click Manage Themes on the Payment Services page and add Confido Legal to the appropriate billing theme.
Please note: to accept trust payments, we recommend creating a separate billing theme in Xero. Repeat the steps above to add a Confido Legal (Trust) payment service with a separate Standing Link designated for the trust account. Then attach the Confido Legal (Trust) service to the trust billing theme.
- After payments are made, you will need to apply the payments to the corresponding invoice in Xero.
Tip: you can automatically apply the payments to their corresponding invoice using Zapier. See our related article on Connecting Confido Legal and Xero via Zapier.